
Finally!


This Poppy painting has been 'on the go' since 2006.  At least that is when I saw a painting similar that wasn't available to buy so decided I would paint my own.  I took photos and measurements and came home from my holiday full of enthusiasm...

A few years after that I sketched the outline on to a canvas.

A few years after that I decided to paint it but had a fight with my easel and it won.

A few weeks ago I decided to go for it again, this time without the easel, just using the floor and a large plastic sheet.

Once I got started I wondered why it had taken me so long - I do so love painting!

I used acrylics for the centre, stem and leaf and Bombay Ink for the petals.


The ink I used is called 'red' so I was expecting it to be much redder than it turned out.  It seems more pink to me.


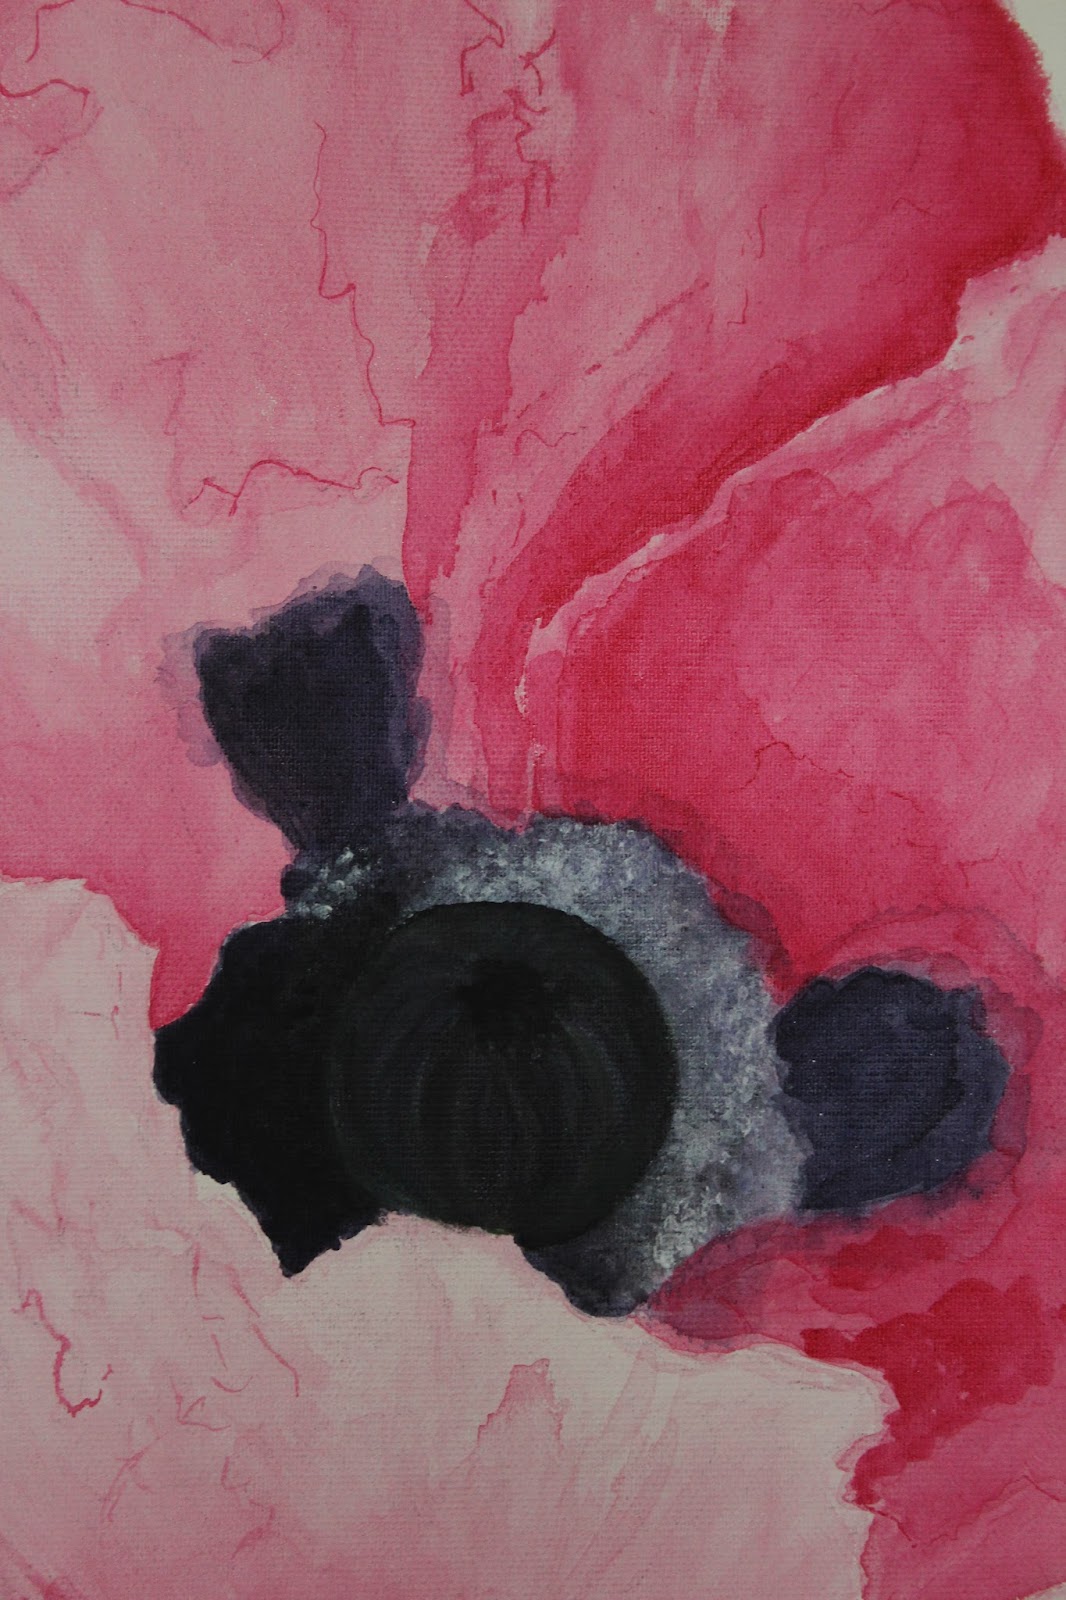
I have since ordered some more inks in various shades of red and I will do another to try and get it to look like it is in my head!


The ink was so lovely to use, something I wish I had tried out ages ago.


Now I'm hooked and planning a rose and maybe a pansy too...
 
Thanks for stopping by!


Comments

  1. wow!!! gorgeous! you are so talented!

    ReplyDelete
  2. Hola Laura, thank you for your comment.Is nice to see you in my blog:D
    Simply...AMAZING, AMAZING, AMAZING WORK!!!! you're an artist.Well done.
    Hugs from Palma de Mallorca

    ReplyDelete
  3. Laura, this is absolutely stunning... Even if it did take you years to complete, you've done a superb job on this poppy. I love the colour - much more subtle and unusual than red. It is amazing... Love the close-up detailed shots too. Amazing technique. Thanks for sharing this beautiful work of art with us.

    Shoshi

    ReplyDelete
  4. Wow this is gorgeous - what an amazing piece of work.
    Hugs
    Suzie xx

    ReplyDelete
  5. I really like this. The textures on the petals are amazing!

    ReplyDelete
  6. wow, really beautiful! I love the pink, really pretty and relaxing. M x

    ReplyDelete
  7. Love it! Go on with rose and pansy...

    ReplyDelete

Post a Comment

Thank you for taking the time to comment.
I love to read your messages...

Popular posts from this blog

WOYWW 159

Hello, Happy Whats On Your Workdesk Wednesday !  As promised a picture of last Wednesdays 'work' finished off.  Post and more photos here . This week I'm showing off the beaded ATC I made... Tricky to photograph so your getting one with flash and one without... It was all parcelled up and sent off to Queen of Desks Julia .  Here is a basic of how it was made... (lots of waffle about wefts and warps!) I use a flexible beading needle.  It is mainly 'eye' so it is very easy to thread. And delica beads which are more regular and accurate than the better known seed bead.  They are slightly more rectangular than round so they line up better. Thread your needle with the weft thread.  (The cross ways thread that weaves back and forth.)  Pick up the beads... Pass the needlefull of beads underneath the warp (tight length ways) threads on the loom... ...and push each bead up in the corresponding g

Hoppity!

Hoppity hoppity!!  :) Hopeful you have arrived here from Fleur 's blog as part of the Crafty Ribbons Easter Hop .  If not and you've found yourself here wondering what on earth I'm on about (and let’s face it J you wouldn’t be the first!!) check out the Inspirations site for all the juicy details! My project for the hop is         Easter bunting!  I cut three templates first - a triangle pennant, a bird and a heart.        Then I cut the pennant shapes from fibre ribbon, threaded them on to some 3mm satin and evenly spaced them.  I embellished each flag with some beads...       I backed the birds and heart on some thin white card and glued them to the centre of the pennants.   My supplies list: yellow fibre , pink fibre , lime fibre , 3mm satin , button box , white card, glue, beads, needle and thread.   At each stop on the hop there'll be a word to collect and a candy draw. I've got these

WOYWW & Card Deck Swap

First up is my desk ... Hmm.  Perhaps the less said the better!  I really should have a sort out but I fancy desking instead! Next I want to share my card deck swaps (deskers don't have to stay for this bit but I reckon you'd enjoy joining in with us, which is why I'm including it in this post) You can read about the swap here on Jessica's blog and sign up here .  Basically, we take a deck of cards, add paint and/or paper, then add a positive sentiment to each card.  Post them to Jessica who shuffles them and sends back 52 different cards from different artists (yes, you are an artist!) from all over the world. These few are ones I have picked out to display first.  I'll swap them round after a few weeks.  Do you like my domino pegs?  :) Thanks for stopping by.  I hope you'll at least consider joining us for the card swap - it's like a super sized ATC swap, and all WOYWW er's know they are fun! See you at your desk x