
Pretty Notebook Cover


At Crafty Ribbons Challenge this fortnight the theme is use at least two ribbons.  What a great theme for me... and I even managed to sneak some neon colour in!!

 I came up with this...


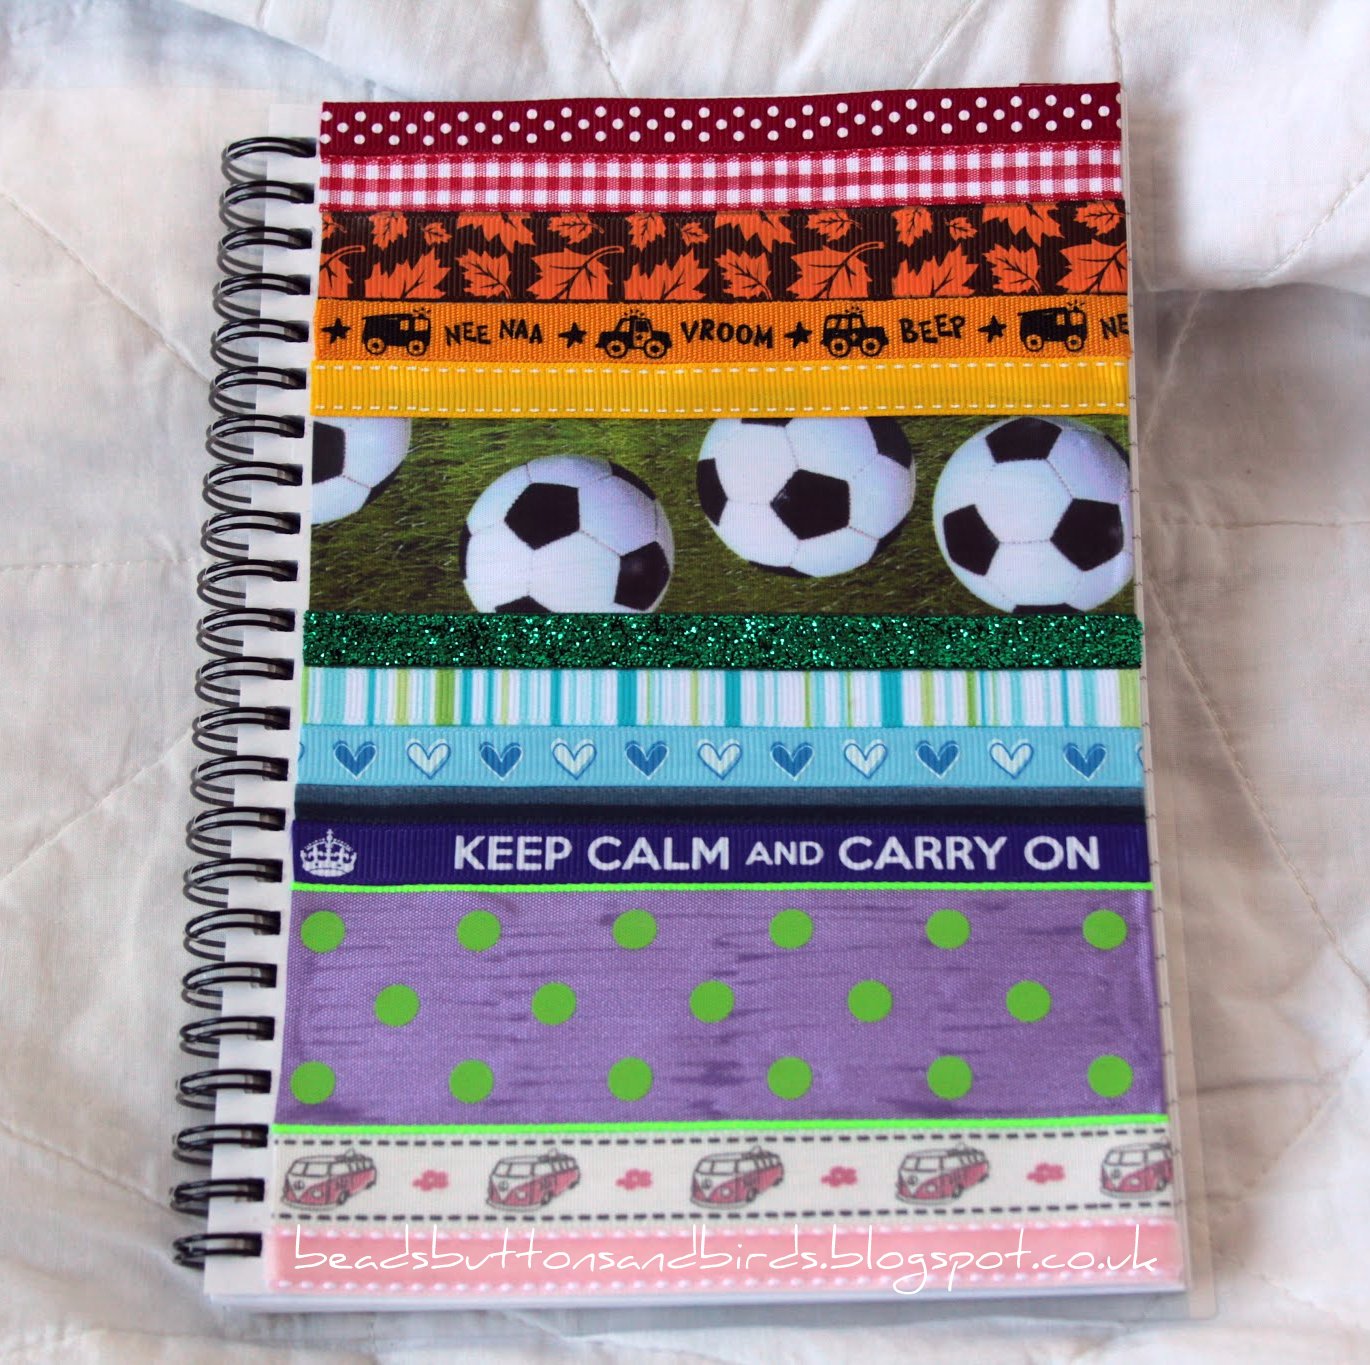
When I joined the DT I decided I needed a note book to keep all my ribbony ideas in and to record what projects needed to be in on what date - I'm the Queen of notebooks and lists.  :)
 
I had so much fun picking out which ribbons I would use.  In the end I decided to do the front in a rainbow of colours and the back in black and white.


I took the plastic covers off a notepad.  I had originally planned to cover them but the ribbon would not hold to the plastic no matter which glue I tried.  I then simply stuck lengths of ribbon to the inner cover.  I turned the page over and folded the ribbons over and stuck them down.  To make it a bit more durable I covered the ends with a wide piece of grosgrain.


To provide a bit more protection and to replace the plastic cover that I had discarded I laminated an empty pouch.  I cut around the plastic cover, rounded the corners and marked where the holes needed to be for the spine.  I used my eyelet punch to cut them out.  The slipped them back on to the spiral spine.


I can't possibly list all the ribbons I have used but they are all available here.  If you have any questions or can't find them on the site just leave me a comment and I'll help you out.
 
I'm so pleased with this.  I can see myself making more of these for gifts.  The only thing I would do differently is not use the lilac and neon ribbon.  It is a slightly different texture and the glue seeped through a little but I still love it!
 
I'd love to enter this in to Crafts and Me Challenges - ribbon or trim
 
Thanks for stopping by...


Comments

  1. Fabby. Would make great RAK gifts;)

    ReplyDelete
  2. Great idea, I am not sure I understand the laminating bit and how you got it back on the spiral wire, or if you just slipped it over the ribbons.

    Cazzy x

    ReplyDelete
    Replies
    1. Hi Cazzy,
      The laminated sheet was literally an empty pocket put through the machine. I only have very thin acetate but using a thick stiff acetate would give exactly the same results. I just trimmed it to size and popped it on the front and back so that it would take the sticky fingers and day to day bashings. The spiral was quite forgiving and I opened it very slightly to get the laminated sheet on. I then bent the spirals back so it wouldn't come off again. When I do another one I'll take some step by step photos and let you know...
      L x

      Delete

Post a Comment

Thank you for taking the time to comment.
I love to read your messages...

Popular posts from this blog

WOYWW 159

Hello, Happy Whats On Your Workdesk Wednesday !  As promised a picture of last Wednesdays 'work' finished off.  Post and more photos here . This week I'm showing off the beaded ATC I made... Tricky to photograph so your getting one with flash and one without... It was all parcelled up and sent off to Queen of Desks Julia .  Here is a basic of how it was made... (lots of waffle about wefts and warps!) I use a flexible beading needle.  It is mainly 'eye' so it is very easy to thread. And delica beads which are more regular and accurate than the better known seed bead.  They are slightly more rectangular than round so they line up better. Thread your needle with the weft thread.  (The cross ways thread that weaves back and forth.)  Pick up the beads... Pass the needlefull of beads underneath the warp (tight length ways) threads on the loom... ...and push each bead up in the corresponding g

Hoppity!

Hoppity hoppity!!  :) Hopeful you have arrived here from Fleur 's blog as part of the Crafty Ribbons Easter Hop .  If not and you've found yourself here wondering what on earth I'm on about (and let’s face it J you wouldn’t be the first!!) check out the Inspirations site for all the juicy details! My project for the hop is         Easter bunting!  I cut three templates first - a triangle pennant, a bird and a heart.        Then I cut the pennant shapes from fibre ribbon, threaded them on to some 3mm satin and evenly spaced them.  I embellished each flag with some beads...       I backed the birds and heart on some thin white card and glued them to the centre of the pennants.   My supplies list: yellow fibre , pink fibre , lime fibre , 3mm satin , button box , white card, glue, beads, needle and thread.   At each stop on the hop there'll be a word to collect and a candy draw. I've got these

WOYWW & Card Deck Swap

First up is my desk ... Hmm.  Perhaps the less said the better!  I really should have a sort out but I fancy desking instead! Next I want to share my card deck swaps (deskers don't have to stay for this bit but I reckon you'd enjoy joining in with us, which is why I'm including it in this post) You can read about the swap here on Jessica's blog and sign up here .  Basically, we take a deck of cards, add paint and/or paper, then add a positive sentiment to each card.  Post them to Jessica who shuffles them and sends back 52 different cards from different artists (yes, you are an artist!) from all over the world. These few are ones I have picked out to display first.  I'll swap them round after a few weeks.  Do you like my domino pegs?  :) Thanks for stopping by.  I hope you'll at least consider joining us for the card swap - it's like a super sized ATC swap, and all WOYWW er's know they are fun! See you at your desk x