
The fakes!


I got to work thinking about what kit components I could fake.  In addition to patterned papers I thought I might have a go at making my own paperclips...


As always I started with a list and some sketches!  And then gathered the bits I would need.   used the wire from spiral bound note books that were finished.  I found it quite hard to manipulate the wire with out having things to bend it around.  I also found that cut ends needed to be sanded - I learnt that the hard way - ouch!


WARNING:


After giving myself a manicure I carried on with the paper fakes.  These are the patterned papers in the original kit


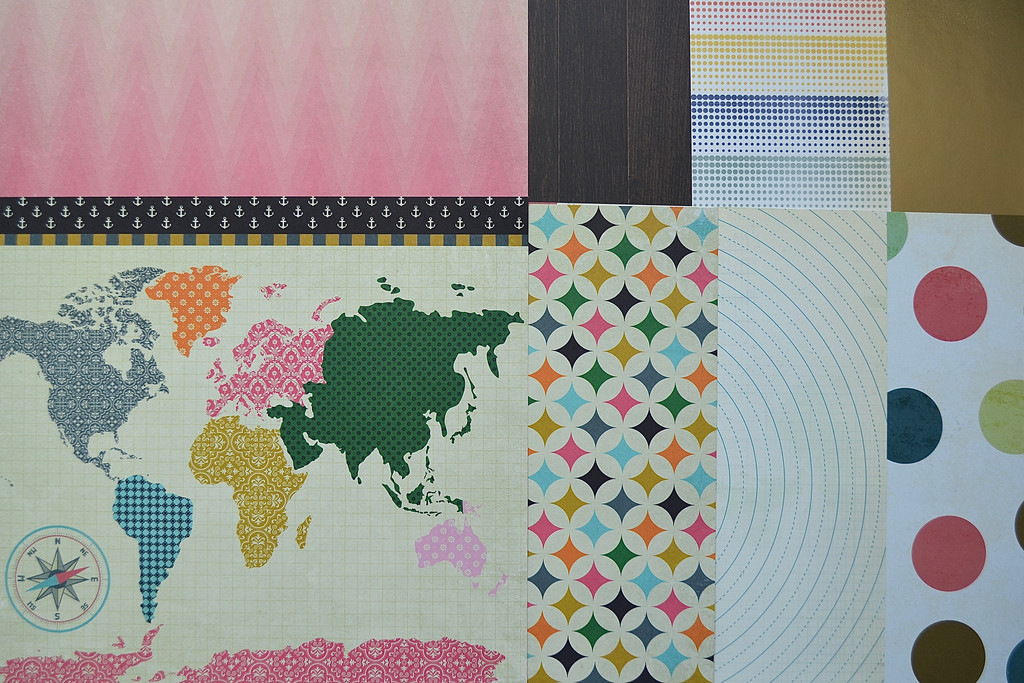
I thought I could forge the pink ombre chevrons, the big polka dots, the yellow stripes (from the add on) and I was determined to try something with the 'round sided diamond shape' - not really sure what to call that!!


I had four wooden 'round sided diamond shapes' which I glued to an acrylic stamp block with temporary adhesive.  I then used the stamp on scraps of white card to give the pattern (or a rough guesstimate of the pattern!  I need to double up the stamping to get the exact pattern but haven't done that in these photos - doh!)


Next up was the chevron.  I made a zig zag template from some thin card - see those triangles?  They got saved and I'm sure will turn up later in the month...  I have an idea!!  Anyway, the template, some watered done gesso of varying strengths, and a sheet of pink card stock all got mixed up... results down the bottom.


Then for the polka dots I simply punched out some circles in the right colours and stuck then to a white off cut.  I didn't make a whole sheet, just a snippet.

For the yellow stripes I used a ruler and white paint pen to mark out the pattern and filled in with some gesso.  Easy.

Here they are;


Really pleased with the papers - less so with the clips but you live and learn.  I also reminded myself how many shades of plain cardstock I have and how simple it is to make your own patterned papers.  The polka dots could be in any colourway and, for that matter, any punched out shape.  I might try butterflies next.  Or stars.  Right I'm off to play!

Thanks so much for stopping by!


Comments

  1. I'm glad you were able to soldier on, despite that dramatic nail injury:) LOL

    ReplyDelete
  2. Very creative.. thanks for sharing your tips.

    ReplyDelete
  3. Aw, the clips look wonderful! I think, though, that you chose some difficult wire to manipulate - the stuff they use for those binding springs is quite tough! x

    ReplyDelete
  4. The forged paper looks so cool!

    ReplyDelete
  5. I love your "fakes" … especially that paper clip!!

    ReplyDelete
  6. Clapping my hands over your counterfeits! I am still thinking of what I could use to try the paperclips - you almost need a grid of nails, or something... The papers I am swooning over - LOVE. Fab forgeries, my dear :~)

    ReplyDelete
  7. Oh you are brave making your own paperclips!

    ReplyDelete

Post a Comment

Thank you for taking the time to comment.
I love to read your messages...

Popular posts from this blog

DMIO: Teach Me Something

A few weeks back I made a dream catcher.  A few readers asked if I could show them how I made it, so, here is my attempt at a tutorial! First up weaving the web. 1. You'll need a hoop and some ribbon/thread/yarn on a bobbin. 2. Attach the ribbon securely to your hoop. 3. Take your ribbon over the top of the hoop... 4. and up through the loop you've just made with the ribbon... 5. so you have a cross over. 6. Continue steps 3-5 until you reach the knot. 7. Now instead of going over the hoop you will crossover the ribbon 8. and through the loop you've just made to give a crossover. Continue on in this fashion until you get to the middle. You need to leave a hole in the middle as this is where the good dreams get through!  They then run down the tassels/feathers/any other hanging decoration and on to the owner.  It should look something like this.  You'll need to play around with your tension until you get a firm web. Now for the tassels - I like to

Scrap It OFF! Design Team Reveal & Anniversary blog hop!

Hello there, welcome to my stop on the SpiegelMom Scraps anniversary hop .  Six years running her business - congrats Jody, here's to the next six! You should have arrived via Claudia - I love her collections and can't wait to be able to buy them rather than print my own.  Or you can start the hop at the beginning here . I have a layout celebrating SpiegelMom Scraps and my DT position with them using the fabulous Raspberry Daisy Dream sequin mix . You can grab the cut file I made to use for yourself.  I have a few others here too. I am delighted to be staying on the team for another term - stand by for more sequin-y goodness.  I have plans for more jewellery, cards, art, gift wrapping/Christmas goodies, and of course lots more scrapbook pages. Your next stop on the hop is Rachel .  Happy Hopping!! Thank you for spending your time with us today! I'd love for you be in the running for the prizes that Jody is giving away on this blog hop, so be s

A Poe Quote

So I've been trying out art journalling for a while but had nothing that I wanted to share, until now. I was inspired by The Bears Challenge and picked this quote to base my page on. "If you wish to forget anything on the spot, make a note that this thing is to be remembered" I got some paints out, some spray mists too.  I used my fan brush, my fingers and a cotton rag.  I got messy, satisfyingly messy :) The letters are some old letraset vinyls that were my Aunt's.  When we cleared my Grandparents house I couldn't stand the art goodies to go to waste.  I saved them because I knew one day I would find a use for them.  They must be 40 years old but are still perfect.  (I sometimes look at things I get today and think they won't still be good in 5 years let alone 40!) I don't have the complete alphabet so there are some adaptations... c's became o's, E's became t's, w's became m's.  I magicked a k from a P!  Some