
Chococo


Here is a post first published last week on SpiegelMom Scraps blog...

-------------------------------------------------------------------------------------------

For my third guest designer project for SpiegelMom Scraps I promised you a mini album... and here it is!


I had a wonderful lunch at a chocolate cafe and thought it would make a lovely mini album, so I collected a few bits and pieces from the cafe.  I picked up the chocolate menu, and kept some cellophane wrapping and tissue paper used to wrap up my purchases, and the companies ribbon that was used to tie the package.  I also kept the paper bag and the label from Mum's tea bag.


The plan was to build a little kit around the collected ephemera, so I searched my paper and washi stash for matching colours.  Serendipitously the ribbon in SpiegelMom Scraps Etsy shop were the perfect colours.


I added cork shapes and wood veneers to my mini kit, and enough sequins for them to feature on every page.  The sequins were my constant through the whole album helping to pull it all together and give a cohesive feel.


My page size was dictated by the menu - it consisted of 4 squares in a concertina.  I cut them in to separate squares and planned the entire album around them.  I added in a few plain cardstock pages so I didn't have to cover up all of the information with my photos.


Some pages I kept plain so you can read all the details on the menu, some I layered up with dimensional adhesive.  It gives a chunky finish to the album and feels really satisfying to flick through and handle.


With the cellophane and tissue paper a made some pockets.  Simply stitching around the edges trapping sequins and vellum stars inside.


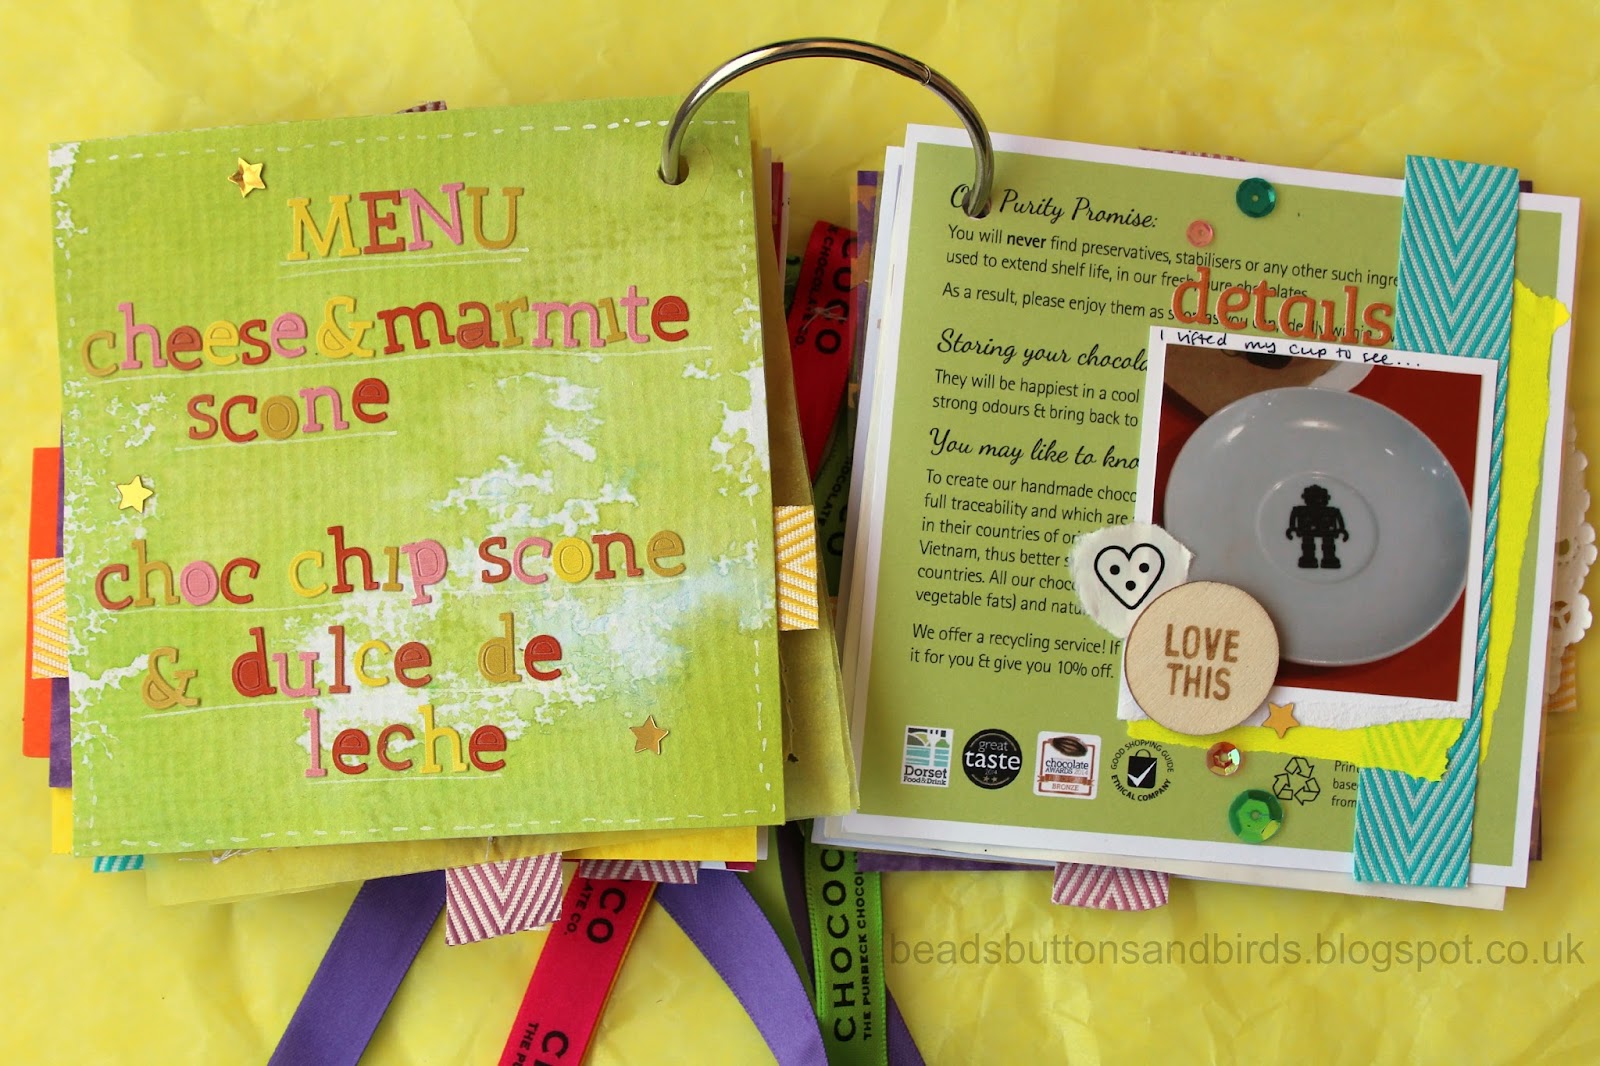
Do you see the little heart on the right hand page?  That is part of the shop logo printed on the paper bag!  Nothing went to waste.


The white page on the left is a square cut from the paper bag.

I added some doilies, also available in the SpiegelMom Scraps store.  I love the way the modern neon yellow peeps through the vintage-feel doilies.


Supplies added to my collected ephemera:
ribbon
exclusive cork chevrons
sequins
wood veneer
doilies
foam adhesive
exclusive vellum stars


Linking up at Inspire Me Monday, Creative Mondays,

Thanks for stopping by, I would love to hear what you think of this mini album...


Comments

  1. Laura, I love this little album. A nice reminder of a good time out with your mum.

    Hope have had a lovely weekend. Sue

    ReplyDelete
  2. Love this idea, very creative :)

    Thanks for sharing at Creative Mondays ..

    ReplyDelete
  3. your mini album is very nice

    ReplyDelete

Post a Comment

Thank you for taking the time to comment.
I love to read your messages...

Popular posts from this blog

Hoppity!

Hoppity hoppity!!  :) Hopeful you have arrived here from Fleur 's blog as part of the Crafty Ribbons Easter Hop .  If not and you've found yourself here wondering what on earth I'm on about (and let’s face it J you wouldn’t be the first!!) check out the Inspirations site for all the juicy details! My project for the hop is         Easter bunting!  I cut three templates first - a triangle pennant, a bird and a heart.        Then I cut the pennant shapes from fibre ribbon, threaded them on to some 3mm satin and evenly spaced them.  I embellished each flag with some beads...       I backed the birds and heart on some thin white card and glued them to the centre of the pennants.   My supplies list: yellow fibre , pink fibre , lime fibre , 3mm satin , button box , white card, glue, beads, needle and thread.   At each stop on the hop there'll be a word to collect and a candy draw. I've got these

WOYWW 159

Hello, Happy Whats On Your Workdesk Wednesday !  As promised a picture of last Wednesdays 'work' finished off.  Post and more photos here . This week I'm showing off the beaded ATC I made... Tricky to photograph so your getting one with flash and one without... It was all parcelled up and sent off to Queen of Desks Julia .  Here is a basic of how it was made... (lots of waffle about wefts and warps!) I use a flexible beading needle.  It is mainly 'eye' so it is very easy to thread. And delica beads which are more regular and accurate than the better known seed bead.  They are slightly more rectangular than round so they line up better. Thread your needle with the weft thread.  (The cross ways thread that weaves back and forth.)  Pick up the beads... Pass the needlefull of beads underneath the warp (tight length ways) threads on the loom... ...and push each bead up in the corresponding g

DMIO: Teach Me Something

A few weeks back I made a dream catcher.  A few readers asked if I could show them how I made it, so, here is my attempt at a tutorial! First up weaving the web. 1. You'll need a hoop and some ribbon/thread/yarn on a bobbin. 2. Attach the ribbon securely to your hoop. 3. Take your ribbon over the top of the hoop... 4. and up through the loop you've just made with the ribbon... 5. so you have a cross over. 6. Continue steps 3-5 until you reach the knot. 7. Now instead of going over the hoop you will crossover the ribbon 8. and through the loop you've just made to give a crossover. Continue on in this fashion until you get to the middle. You need to leave a hole in the middle as this is where the good dreams get through!  They then run down the tassels/feathers/any other hanging decoration and on to the owner.  It should look something like this.  You'll need to play around with your tension until you get a firm web. Now for the tassels - I like to